| 1.0 Welcome |
HTML Basics |
| 2.0 Introducing HTML |
| 2.1 Page Layout |
| 2.2 HTML Files |
| 2.3 Text Formatting |
| 2.4 Lists & Extras |
| 2.5 Inlining Images |
Linking to Stuff |
| 3.0 Introduction |
| 3.1 Internal Links |
| 3.2 External Links |
| 3.3 Hot Links |
| 3.4 Image Maps |
Advanced HTML |
| 4.0 Tables |
| 5.0 Frames |
| 6.0 Forms |
Publishing Your Site |
| 7.0 Publishing |
| 7.1 Site Hosting |
| 7.2 FTP |
Appendix |
| Golden Rules |
| Color Codes |
| Typefaces |
| Escape Sequences |
Printable Version (pdf) |
Main Site:  |
So, how do you jazz your page up by adding images to it? Let's have a look how now...
Image File Formats
There are three file formats that are used on the web and each has its pros and cons:
- GIF: This stands for "Graphics Interchange Format" and is the compressed format (sometimes known as a Compuserve Bitmap) developed by Compuserve as a quick way to transfer what would otherwise be "byte hungry" image files over the phonelines (as that is what we all once had to use before ISDN and now ADSL!). The compression acts to compress areas of similar colour within the graphic, thus reducing download time. Because of this compression on areas of similar colour, this format is not too good for images that are more complex, so you only use "gif" format for simple images like logos, that don't involve many colours.
- Interlaced Gifs are those images that sharpen up gradually as a web-page is loading up. These are really useful, and somehow add a little intrigue to the page. You should find there is a check-box or something similar in the "Save As" dialogue box of your graphics programme, where you can set up a gif file to interlace.
- Transparent Gifs are those that appear to sit right on the background, as opposed to sitting in a little box all of their own! Again, when you are making up the gif file in your graphics programme, you should have a transparency tool somewhere in there, which will enable you to select the bits you want left transparent. Then just save the image, and you're done!
- JPEG: This stands for "Joint Photographic Experts Group" and reduces the file size by reducing image quality, so you would use this where gif format will not be useful (e.g. where there are more colours involved). It is therefore the format that is normally used for photographs and more complex images. JPEG (or JPG) does allow you to specify the compression you want. Remember: the better the quality, the larger the file thus the longer the download time! So you will need to experiment! Oh, BTW: JPG format does not support any form of transparency and they don't interlace as well as gifs do....but it is nevertheless a vital format!
- PNG: This stands for "Portable Networks Graphic" and is a newer type of image file supported by modern web browsers. It was created to improve upon GIF format and also to resolve the problem of using GIFs because they are in fact patented so technically you are not really supposed to use that format without a licence! In fact, there was another thing they were named for - "PNGs Not GIFs" for that reason!
I won't bother to write more about graphics formats - there is masses on them elsewhere on the web...All you need to know is that to get an image to display on a web page, it needs to be in JPG ( or JPEG) format, GIF format or PNG format. So if you have an image with an extension like .PSD (from Photoshop) then you'll first need to export it as one of those other formats in order to see it!
Inlining Images
So how do you actually insert an image onto a web page? Well, the first thing to know is that the technical way to describe this is "inlining images" if you want to be "proper" but I usually say "I've bunged an image/photo/whatever on there"! Anyway, it is so simple to do, it's daft really! All you do is place the following bit of code at a point in the page where you want a graphic (or whatever) to appear and, providing you have the path and filename correct, when you open the file in your browser, blam - you should see your image!
<IMG SRC="filename.gif" ALT="a description" BORDER="1" WIDTH="158" HEIGHT="20">Here's what it all means:
- "IMG": this is the element itself - the "Image" element.
- "SRC": this is the attribute used to link to the file - you can think of it as meaning "Source", as in the source of the image on the server that is hosting your web site.
- "ALT": this attribute lets you enter a name for the image which would appear in place of the graphic if the viewer has turned off graphics in their browser, or if there is an error with the graphic or the code that links to it. However, this attribute is also important to search engines who use it to determine the relevancy of your page in search results. So there is a sneaky use of the ALT attribute - you can use a description that is to do with what you are selling, for example, and use it to increase your web site's relevancy in searches so that it appears higher up the search rankings than it might otherwise. My ALT attributes tend to say things (for this site) like "HTML Tutorial" for this reason. However, do be careful not to use more than, say, two repetitions of the same ALT variable (description) because the search engines like Google actually have code in their spiders (the automated programs that search the web for web sites) that checks for repetition and will mark down your site if it does so that it appears lower down - or even not at all - in the search rankings.
- "WIDTH" and "HEIGHT": These attributes allow you to set the dimensions in pixels, for how you wish the image to display. Leaving these attributes out will inline the image the same size that it was saved. You can thus use these attributes to manually manipulate the size of an image. Though you can do this, it is not such a great idea because if you are making an image appear smaller, the image will nevertheless still take the same time to download as its actual size (so you will save download time by making the image smaller in the first place!) and using width and height tags to make an image larger than it really is will show a degree of image degradation depending on by how much of a percentage against the original size you are trying to increase it. I never use width and height tags myself - I just make sure I have used Photoshop to get the image exactly the size I want before I use it. It makes life a whole lot easier and you have much more control over download times as a result. But I thought I would include these tags for completeness!
- "BORDER" should be obvious! You do not need this if you do not want a border as the image will
have no border by default. However, this is not the case if you are using an image to link to something (i.e.
when the user clicks the image, they get taken to another page). Such links are called "hot links"
and we will talk about them later. Suffice for now to say that if you do not want the irritating blue border
around your hot link (which is the default) then you should use the code
Border="0"to turn it off! - "ALIGN": I could have included this in the bit of code above. "Left" is the default so you do not have to enter that at all. However, you can also align a graphic "center", "right", "top", "middle" and "bottom" as well! The best thing is to play with the image placement until you get what you want bearing in mind that if you select "left", your text will wrap around the right-hand side of the image, and if you select "right" your text will wrap around the left-hand side of your image!
Inlining Images with different file locations
You may have already guessed that not only if you don't set the right filename in the
SRC=" part of the code will your image not appear, but also if you don't set the correct
path (direction to your image) nor will it appear either! So we need to talk a bit more about paths to images
and how you define them in your code to make sure your image does appear! So first, let's look at a simplified version of the code we introduced earlier...
<IMG SRC="filename.gif" ALT="a description">Now, this code works fine if you have your image in the same place on your hard drive - AND your web server too - as the html file in which you place this bit of code. However, it makes it far easier for me to manage my web sites if I have a folder that is specifically set aside just to contain images which I usually call "Assets" and put in the root folder of my web site. If you do what I do, then your code would instead look like the below:
<IMG SRC="Assets/filename.jpg" .......>
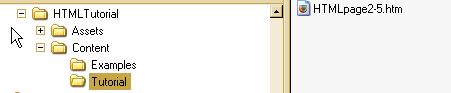
There is another situation that you will encounter to do with filenames. You would normally have your index.htm page in your web root directory, along with an "Assets" directory. But on a larger web site, the other pages tend to be put into different sub-directories to make the web site easier to manage. Look at the screenshot below - you can see that there is a file called "HTMLpage2-5.htm" and that it is within the "Tutorial" directory. If you count back up the tree to the root directory called "HTMLTutorial", how many steps is it? You should find the answer to be 2, because counting up from the "Tutorial" directory: one step takes you into the "Content" directory and another step takes you into the "HTMLTutorial" directory.
What's so important about that? Well, imagine that we want to put a link in the page code of "HTMLpage2-5.htm" to a graphic that is in the "Assets" directory. If we just used either of the two examples of code given earlier, it wouldn't work because of the fact that there are two steps to get back to the "HTMLTutorial" directory before you even talk about getting into the "Assets" directory!
In this example, all that has to happen in your code is you put a ../
in front of the Assets part of the link. And, you need one of these ../ for every
step needed to get back into the directory within which your images are stored. So in the case of my example where
it was two steps to get from the file in which an image link is placed back to the location in which the images
are stored (in my case, the Assets directory. So all we do with the code is:
<IMG SRC="filename.gif" ALT="a name" BORDER="x" WIDTH="x" HEIGHT="y">See? Simple when you know how! I should just state again in case it isn't clear that you should have an exact replica of the directories you are coding to (that are on your local hard drive) on your actual web server. If the structure on the web server is different, it will make the number of steps to get back to your images directory different than when you coded for files on your local hard drive - and of course then you will find that when you access your lovely site via the actual world wide web (rather than looking at your files locally) your images won't appear!
NOTE: You can use images - or parts of images - as links to other pages and resources using some nifty playing with code! I will show you how in the next section of this tutorial....
Backgrounds
You can have a graphic as a page backgrounds, table background - in fact a background to anything you like!
Let's look at page backgrounds first - imagine each box below as being a page...
So what about the code? Assuming again that you are storing images in a directory called
Assets here it is:
Left one: <BODY BACKGROUND="Assets/bg-psychadel.gif" text="#ffffff">
Right one: <BODY BACKGROUND="Assets/bg-rosemarble.gif" style="background-attachment:fixed; text="#000000">
You will obviously need to use your own filename and path in exactly the same way as I described in the previous section above, otherwise it won't work!
Note the use of style="background-attachment:fixed; in the
second one. That is the instruction for making the background stay in one place when you scroll. Do you notice
anything odd about the format of that particular instruction? Note too, how I am not calling it an
"attribute". Well that is because it isn't HTML! "What?" I hear you say! In fact, the
bit that says "style" is an HTML attribute, but the rest of it is "inline CSS".
Don't worry, we'll look at CSS later. For now, just realise that this tiny bit of special code is what
makes the page background image stay fixed to the page whilst the text flows over it, so if you wan' to use
that interesting effect on your web site, then you'll need to use it!/p>
Another thing to note is about the graphic files used for backgrounds. In fact they can be really small. The two images used as the backgrounds above are shown below so you can see their actual size:

See how small they are compared to how big they appear in the "imitation pages" above? That is because when you use the background attribute, the browser takes that to mean that it is expected to "tile" the image whose path and filename appears as the variable of that attribute. Tiling simply refers to an image being repeated at regular intervals. This is great, because you can image how large a file could end up being if you had to use an entire image and not a small one that can tile - so saves on download times.
You can imagine that you need to be careful when selecting images for backgrounds because of this tiling business though - if the image you want as a background has borders or something different at each edge, you will end up with lots of well-defined blocks of image on your page!
NEXT: So how do you link to your other stuff - or other people's stuff?
 |
 |
 |


 © 1998-2008